
Quickly start up your Web integration with Leanplum
This article is your first step to activating the Leanplum Web SDK. Once completed, you will have access to all the goodness Leanplum provides. Follow the steps below.
Leanplum Web SDK (JavaScript) provides the following functionalty:
- Collect data from your Web App, Progressive Web App or other JavaScript-based platforms
- Send Push Notifications to Web Browsers
- Send Inbox Messages to Web Apps
- Utilize Variables in Web Apps
STEP 1: Add the SDK to your web application
We offer three methods to add our JavaScript library to your application. See below for those options.
A. Content Delivery Network (CDN)
The easiest way to add the Leanplum web SDK is through a CDN. We leverage jsdelivr with the latest version of our SDK. Add the below in the <head> of the HTML file to load the JS SDK.
<script src="https://cdn.jsdelivr.net/npm/leanplum-sdk@LEANPLUM_WEB_SDK_VERSION/dist/leanplum.min.js"></script>B. NPM
The Leanplum JavaScript SDK is available as an NPM package. To use NPM,
run the below command in your project to add
npm install leanplum-sdkC. Download Source Files
Alternatively, you can download the Leanplum JavaScript SDK (version 1.11.0) and host yourself. Once downloaded and added into your project, add the following in the <head> of your html file
<script type="text/javascript" src="leanplum.js"></script>Using Web Push messaging
To use web push in your app, you must add the Service Worker file sw.min.js from our SDK to your root directory, then register the Service Worker and user for push notifications.
For more see Push notifications.
STEP 2: Add Leanplum to your web application
Below is sample code you can add to the first page of your web application to get started with Leanplum. For more on which API Keys are required and where to find them visit
// This value should be set to true only if you're developing on your server.
var isDevelopmentMode = true;

// Sample variables. This can be any JSON object.
var variables = {
 items: {
   color: 'red',
   size: 20,
   showBadges: true
 },
 showAds: true
};

// Get your App ID and Keys from https://www.leanplum.com/dashboard?#/account/apps
if (isDevelopmentMode) {
 Leanplum.setAppIdForDevelopmentMode("YOUR_APP_ID", "YOUR_DEVELOPMENT_KEY");
} else {
 Leanplum.setAppIdForProductionMode("YOUR_APP_ID", "YOUR_PRODUCTION_KEY");
}

Leanplum.setVariables(variables);
Leanplum.start(function(success) {
 console.log('Success: ' + success);
 console.log('Variables', Leanplum.getVariables());
});
Use Your Development Key Only During Your Development PhaseThe Leanplum development key leverages open socket technology in our development pipeline for real-time previewing and analytics. This pipeline therefore cannot support a live production scale and any user data maybe lost as it is not captured in analytics.
Additionally for tighter security, make sure to remove your development key from your app delegate before submitting to the App Store.
Additional Javascript SDK settings
Below are a few further JavaScript SDK settings to keep in mind as you implement the Web SDK
//Starts Leanplum by simply loading the cached variables, and doesn't log a new session. Useful for subsequent page loads inside the app.
Leanplum.startFromCache('mike3958');

//Set the path of the API server
Leanplum.setApiPath('https://api.leanplum.com/api');

//Sets the network timeout in seconds. (Default: 10).
Leanplum.setNetworkTimeout(5);

//Sets the request batching strategy. This applies to production mode only. The default behavior is to batch every 5 seconds.
Leanplum.setRequestBatching(false); // No batching.
Leanplum.setRequestBatching(true); // Batching enabled. Unsent requests are sent on start, pauseSession, resumeSession, and stop
Leanplum.setRequestBatching(true, 30); // Same as above except unsent requests are also sent every 30 seconds.
How to track the session lifecycle.
Leanplum.pauseSession();  // Pauses the current session.
Leanplum.resumeSession();  // Resumes the current session.
Leanplum.stop();  // Ends the current session. Sessions will automatically timeout after 2 hours if stop isn't called explicitly (30 minutes if paused).
STEP 3: Run Your Build/Verify Set Up
Build and run your app and see data start flowing into Leanplum. With your development key in your app delegate, you will be able to see all data flowing into Leanplum in our debugger. You can access our debugger dashboard at https://leanplum.com/dashboard#/help/debug

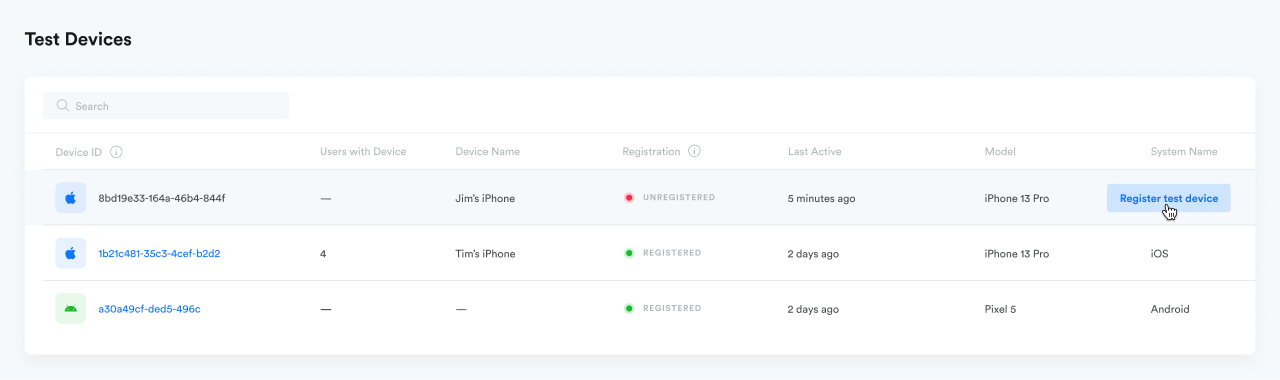
STEP 4: Register Your Test Device
Registering your device as a test device will allow you to preview your messages, variable changes, and any other Leanplum projects. Follow the below to register. Visit https://leanplum.com/dashboard#/account/devices and click on "Register test device" to register your device
STEP 5: Complete Your Integration (NEXT STEPS)
Success! You have now successfully installed the Leanplum JavaScript SDK and registered a test device for further testing. This is an exciting first step on the journey to full integration with Leanplum.
To complete your integration with Leanplum, check out the below articles to learn more about your user data, tracking with Leanplum, variables, importing data and setting up messages.
Articles to Visit Next
- Collecting User Data
- Event Tracking
- State Tracking
- Variables
- Importing Data
- Setting Up Push Notifications
- Build Custom In-App Messages