
Quickly start up your Android integration with Leanplum
This article is your first step to activating the Leanplum Android SDK.
The following setup guide is for developers using Gradle to manage dependencies. This supports Android 4.0.1 (API Level 14) and above.
For more detail, feel free to check out our generated Javadoc or view source code on Github.
Once completed, you will have access to all the goodness Leanplum provides. Follow the steps below.
STEP 1: Install The SDK
To install the Leanplum SDK there are two main options, downloading through the Gradle dependency manager or through a manual setup.
A. Download through Gradle Setup
Moving to Maven CentralJFrog is sunsetting jCenter.
We have migrated all our Android SDK packages, starting from 4.2.5, to Maven Central. All newer versions will be published there.
Leanplum Segment integration is also migrated to Maven Central (versions 1.1.1 and 1.1.2).Use mavenCentral() in your gradle.
- Add the Leanplum repo to your
allprojectsrepositories (Only required for Leanplum Android SDK 4.2.x and below) - In your project-level gradle.build, add
google-servicesto your dependencies for Firebase Cloud Messaging
buildscript {
  repositories {
    jcenter()
  }
  dependencies {
    classpath 'com.android.tools.build:gradle:3.1.4'

    // For Firebase Cloud Messaging.
    classpath 'com.google.gms:google-services:4.3.5'
  }
}
allprojects {
  repositories {
    jcenter()
    mavenCentral()
    maven {
      url "https://repo.leanplum.com/" // only needed for Android SDK versions below 4.3.0
    }
    maven {
      url "https://maven.google.com"
  }
}
Starting with the Leanplum Android SDK 5.4.2+, Java 1.8 compiler is requiredEnsure the below is implemented in your project
android {
    compileOptions {
        sourceCompatibility JavaVersion.VERSION_1_8
        targetCompatibility JavaVersion.VERSION_1_8
    }
}
You will now add Leanplum libraries in your dependencies in your module-level build.gradle file, depending on which Leanplum service you intend to use.
You can use any combination of these libraries, however, leanplum-core is the foundational library which the other libraries depend on. Meaning if you add leanplum-fcm or leanplum-location to your project, leanplum-core will not be needed.
| Library | Description |
|---|---|
| leanplum-fcm | FCM enables push notifications through Leanplum. |
| leanplum-location | Enables location-based messaging. See more here. |
| leanplum-core | Enables core Leanplum functionality: in-app messages, a/b tests, states/events tracking, etc. |
- For only core Leanplum functionality, you will only need to add
leanplum-coreto your module-level build.gradle
dependencies {

  // NONE OF THE ABOVE
  // Automatically included with all of the above Leanplum libraries.
  // Only include if you do not use any other Leanplum libraries.
  implementation 'com.leanplum:leanplum-core:LEANPLUM_ANDROID_SDK_VERSION'

}- To support push or location services with Leanplum, you will be required to add
leanplum-fcmand/orleanplum-locationto your module-level build.gradle
| Leanplum SDK version | Firebase Min Version | Firebase Max Version |
|---|---|---|
| 5.8.1 and above | 22.0.0 | |
| 5.8.0 and below | 17.3.4 | 21.1.0 |
dependencies {

  // Firebase messaging.
  implementation 'com.leanplum:leanplum-fcm:LEANPLUM_ANDROID_SDK_VERSION'
  implementation 'com.google.firebase:firebase-messaging:22.0.0'

  // Location services.
  // Only include if you need location-based messaging.
  // Minimum supported version of play location is:
  // 10.0.1 for FCM.
  implementation 'com.leanplum:leanplum-location:LEANPLUM_ANDROID_SDK_VERSION'
  implementation 'com.google.android.gms:play-services-location:18.0.0'

}
apply plugin: 'com.google.gms.google-services'
Use SDK version 4.2.X until you migrate to Android XUntil you migrate to Android X, you will need to use Leanplum Android SDK version no later than 4.2.X. All Leanplum Android SDK version 4.3.X have dependencies on AndroidX and projects without AndroidX will not work. See here for Android's Android X migration guide.
B. Manual setup Android
For a manual Android setup, follow the below steps.
- Download our SDK from our GitHub page
- Drag the
.jarfile for each required library into your project'slibs/folder. Be sure to includeleanplum-core(andleanplum-pushif using either push library).
See the .jar manifest file below for more info on the above:
<?xml version="1.0" encoding="utf-8"?>
<manifest xmlns:android="http://schemas.android.com/apk/res/android"
    package="[com.YOUR_PACKAGE]"
    android:versionCode="1"
    android:versionName="1.0" >

<uses-sdk
    android:minSdkVersion="14" />
<!-- Base permissions for Leanplum Android SDK. -->
<uses-permission android:name="android.permission.ACCESS_NETWORK_STATE"/>
<uses-permission android:name="android.permission.INTERNET"/>

<!-- Optional. Prevents the device from sleeping when a message is received. -->
<uses-permission android:name="android.permission.WAKE_LOCK"/>

<uses-permission android:name="com.google.android.c2dm.permission.RECEIVE"/>
<permission android:name="[com.YOUR_PACKAGE].permission.C2D_MESSAGE"
    android:protectionLevel="signature" />
<uses-permission android:name="[com.YOUR_PACKAGE].permission.C2D_MESSAGE" />

<!-- These permissions are required only for geofencing. -->
<uses-permission android:name="android.permission.ACCESS_FINE_LOCATION"/>
<uses-permission android:name="android.permission.ACCESS_COARSE_LOCATION"/>

<application
  android:allowBackup="true"
  android:icon="@drawable/ic_launcher"
  android:label="@string/app_name"
  android:theme="@style/AppTheme"
  android:name=".[YOUR_APPLICATION_CLASS]" >

    <meta-data
        android:name="com.google.android.gms.version"
        android:value="@integer/google_play_services_version" />

    <receiver
        android:name="com.leanplum.LeanplumPushReceiver"
        android:exported="false" >
        <intent-filter>
            <action android:name="com.leanplum.LeanplumPushFirebaseMessagingService" />
        </intent-filter>
    </receiver>


    <service android:name="com.leanplum.LeanplumLocalPushListenerService" />

    <service android:name="com.leanplum.LeanplumPushRegistrationService" />

    <service
        android:name="com.leanplum.LeanplumPushFirebaseMessagingService"
        android:exported="false">
        <intent-filter>
            <action android:name="com.google.firebase.MESSAGING_EVENT" />
        </intent-filter>
    </service>

  <!-- For geofencing only -->
  <service android:name="com.leanplum.ReceiveTransitionsIntentService" />

  <activity
      android:name="[com.YOUR_PACKAGE].MainActivity"
      android:label="@string/app_name" >
      <intent-filter>
          <action android:name="android.intent.action.MAIN" />
          <category android:name="android.intent.category.LAUNCHER" />
      </intent-filter>
  </activity>
</application>

</manifest>
STEP 2: Edit Your Application Class
Below is sample code you can add to your application class which gets you started with Leanplum. You may need to create a new class that extends the Application on this step.
For more on which API Keys are required and where to find them visit
Make sure your Application class extends LeanplumApplicationIf your application class does not extend
LeanplumApplication, you must callenableLifecycleCallbacksin our SDK (like the example below). Failure to do so will prevent the SDK from properly tracking states and displaying in-app messages on app resume.
package [com.YOUR_PACKAGE];

import com.leanplum.Leanplum;

// For tracking user sessions.
import com.leanplum.LeanplumActivityHelper;

import com.leanplum.annotations.Parser;
import com.leanplum.annotations.Variable;
import com.leanplum.callbacks.StartCallback;
import com.leanplum.callbacks.VariablesChangedCallback;

public class ApplicationClass extends Application {

  @Override
  public void onCreate() {
    super.onCreate();

    Leanplum.setApplicationContext(this);
    Parser.parseVariables(this);

    //  For session lifecyle tracking. Must be called if you do not extend LeanplumApplication Class
    LeanplumActivityHelper.enableLifecycleCallbacks(this);

    // Insert your API keys here.
    if (BuildConfig.DEBUG) {
      Leanplum.setAppIdForDevelopmentMode("Your App ID", "Your Development Key");
    } else {
      Leanplum.setAppIdForProductionMode("Your App ID", "Your Production Key");
    }

    // This will only run once per session, even if the activity is restarted.
    Leanplum.start(this);
    ...
  }
  ...
}
Add Proguard ConfigurationThis is only needed in your
proguard-project.txtif you use Proguard to obfuscate your code, and if you install via JAR. Our AAR library already includes this configuration.-keepclassmembers class * { @com.leanplum.annotations.* <fields>; } -keep class com.leanplum.** { *; } -dontwarn com.leanplum.**
Set AppIds from XML file
Starting from Android SDK 5.4.2, we support the option to provide the AppId, Production, and Development keys in an XML file. If the keys are not set before calling Leanplum.start they are loaded from Android string resources.
You can provide them by creating app/src/main/res/values/leanplum-app.xml containing:
<?xml version="1.0" encoding="utf-8"?>
<resources>
  <string name="leanplum_app_id">APP_ID</string>
  <string name="leanplum_prod_key">PROD_KEY</string>
  <string name="leanplum_dev_key">DEV_KEY</string>
  <!-- Environment is 'production' OR 'development' -->
  <string name="leanplum_environment">ENVIRONMENT</string>
</resources>
Use Your Development Key Only During Your Development PhaseThe Leanplum development key leverages open socket technology in our development pipeline for real-time previewing and analytics. This pipeline therefore cannot support a live production scale and any user data maybe lost as it is not captured in analytics.
Additionally for tighter security, make sure to remove your development key from your app delegate before submitting to the App Store.
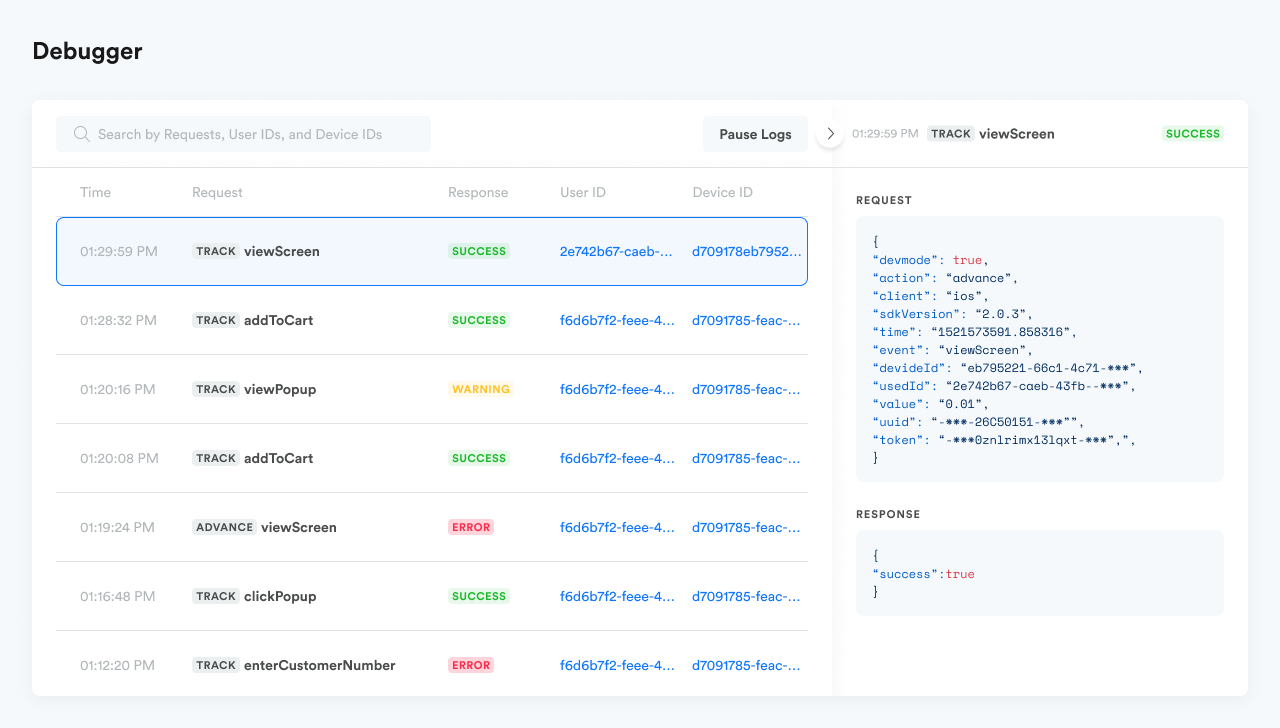
STEP 3: Run Your Build/Verify Set Up
Build and run your app and see data start flowing into Leanplum. With your development key in your app delegate, you will be able to see all data flowing into Leanplum in our debugger. You can access our debugger dashboard at https://leanplum.com/dashboard#/help/debug
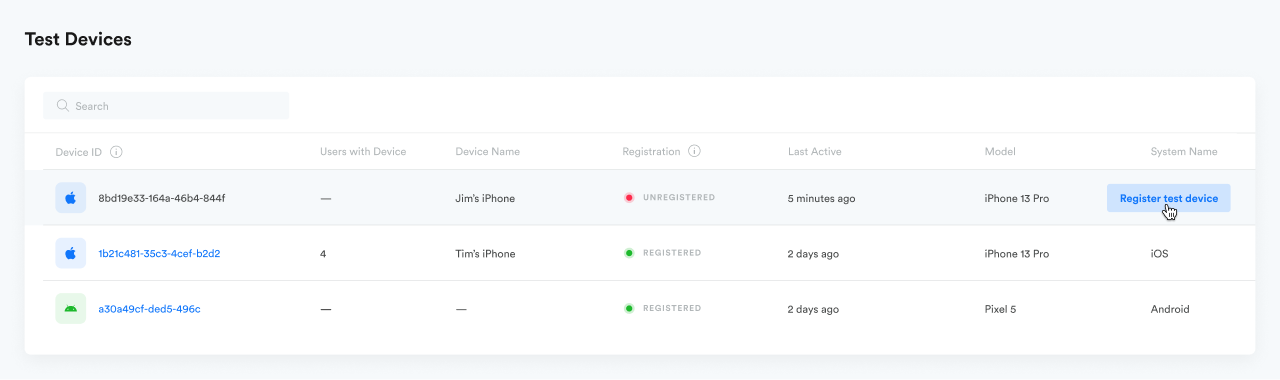
STEP 4: Register Your Test Device
Registering your device as a test device will allow you to preview your messages, variable changes, and any other Leanplum projects. Follow the below to register. Visit https://leanplum.com/dashboard#/account/devices and click on "Register test device" to register your device
STEP 5: Set up FCM push notifications (OPTIONAL)
Below are Firebase Cloud Messaging (FCM) setup instructions. To use this push service with Leanplum, see our guide to using multiple push services.
If you target Android 8.0 (API level 26) or above, you must register at least one notification channel in order to send notifications to users with devices running Android 8.0 (level 26) or later. See our guide to Using Android Notification Channels.
To use FCM with Leanplum, you need to:
- Verify that your Gradle files include the correct FCM and Leanplum libraries (see above).
- Download your
google-services.jsonconfig file (see how here). - Add the above file to your root
app/folder.

Adding config file to app folder
- Copy your FCM Server Key. In the Firebase console, click the gear icon next to Overview, then click Project Settings.

Open settings in Firebase console
Then, in your project's settings, go to the Cloud Messaging tab. In this section of your settings, you will see your Server key. Copy the key.

Server key in FCM Console
- Add your FCM Server Key to Leanplum. In the Leanplum dashboard, in your App Settings click Keys & Settings. Go to the Push Notifications tab and enter/paste your key into the Google API key field.

Add key to Leanplum dashboard
Add a push notification channel
Once you finish your push setup, you'll need to add a default Android Notification channels for your app using our API. This is required before you can start sending push notifications through Leanplum.
STEP 6: Complete Your Integration (NEXT STEPS)
Success! You have now successfully installed the Leanplum iOS SDK and registered a test device for further testing. This is an exciting first step on the journey to full integration with Leanplum.
To complete your integration with Leanplum, check out the below articles to learn more about your user data, tracking with Leanplum, variables, importing data and setting up messages.
Note:If you want to have extended logs in your Android app regarding the Leanplum, you can add the following line:
Leanplum.setLogLevel(com.leanplum.internal.Log.Level.DEBUG);
Keep in mind that this should be used only for debugging purposes.
Articles to Visit Next
- Collecting User Data
- Event Tracking
- State Tracking
- Variables
- Importing Data
- Setting Up Push Notifications
- Build Custom In-App Messages