A/B test your actions
A/B tests allow you measure which campaign strategies or app changes are the most successful. Each test compares a control group of users (A) against one or several test groups known as variants (B, C, etc.). By testing different experiences, you can determine which performs best with your users.
When testing campaigns, we recommend:
- Starting the test when you start the campaign, and allowing the test enough time to demonstrate results.
- Testing one incremental change at a time. This gives you the most accurate data with which to make informed decisions moving forward.
Create a new A/B Test
A/B tests are built into your campaigns, and you can add an A/B test to any campaign you create. From the Action tab of the campaign composer, click the + A/B Test button in the upper right corner of the preview area.
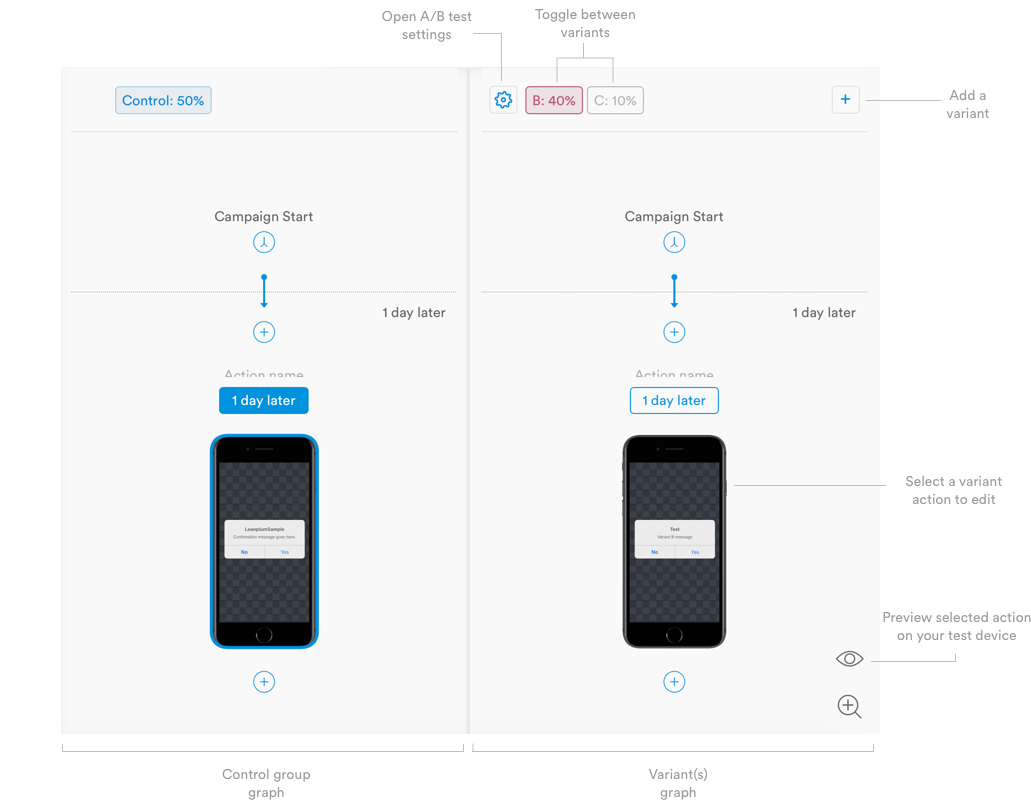
This will duplicate the campaign into a new variant, and display the test groups in a split view side-by-side — the control group on the left, and variant(s) on the right.

Add additional variants. Click the + in the top right corner to add another variant. You can add up to 16 variants (including the control).
Toggle between variants in the editor. Use the buttons above the variant graph to switch between your test variants. The button will darken when its variant is selected.
Edit variant action settings. Click an action in the variant graph to edit its content. Once selected, the action will load in the editor on the left. Keep in mind that the control group sets the minimum set of parameters for the test, if you have an image in it, you cannot have a variant without an image present. However, the reverse is possible
What you can testYou can edit message content and UI settings within a test. Any changes to audience or delivery will be made to all variants in the test, including the control group.
Preview an action. Select a device in the composer, then click the preview icon to send a preview to your test device(s). You can preview actions from any test group.
Edit the test settings
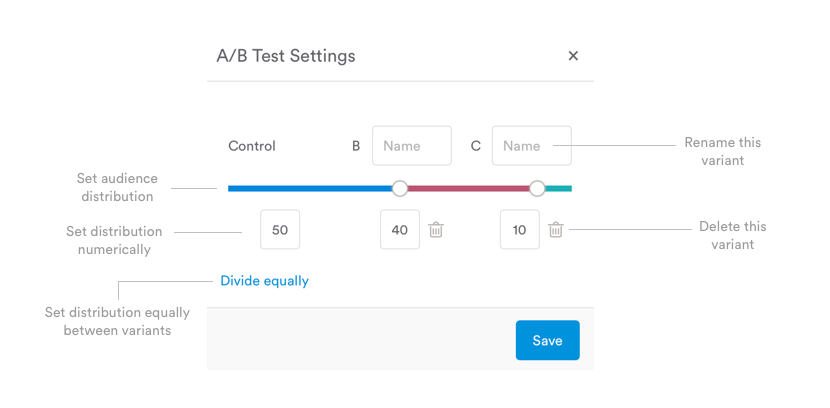
Click the gear icon to view and edit the A/B test settings.

Rename a variant. Enter the new name for that variant, then click "Save."
Delete a variant. Click the trash icon to delete the variant, then click "Delete" to confirm.
Set the audience distribution. Use the slider to adjust the distribution, or manually type in the percentage to control the portion of users assigned to each test group. These randomly-assigned user groups are sometimes referred to as “user buckets.”
When setting the distribution for your test, consider your campaign’s overall audience as well as the sub-audience for the action you are testing. Holdbacks, segments, and other limits on your audience could affect the size and makeup of your test groups. Groups that are too small will make it difficult to reach significant results in a reasonable amount of time.
Make your test sticky. To make your campaign sticky, navigate to the Audience tab and click the magnet icon  above the segment selector. Stickiness ensures users who fit your campaign audience when the campaign starts (say, city = Los Angeles) will remain in the campaign even if their attributes change mid-campaign (say, if they travel to New York).
In an A/B test, users will remain in their given variant throughout the test. If the user exits the campaign, then triggers campaign entry again, they will re-enter the campaign in the same variant they were in before (Leanplum assigns variant groups based on User ID).
Track results
After you start the test, Leanplum automatically tracks a variety of metrics to help you determine which variant is the most effective. You can also view the test in Analytics and select goal metrics to compare between each test variant.
View results of an A/B test. You can view the full results of your test so far in Analytics by clicking the test in the panel at the left of the Analytics dashboard.
Finish an A/B test
Once the test has reached statistical significance and you are satisfied with the results, you can complete the test by clicking Finish A/B Test on the Summary page of the campaign.
Finishing an A/B test does not end the campaign. It rolls out the selected winner to all users in the campaign by replacing each action with the winning variant action.
Currently, we can create only one A/B test for a single campaign.
If you need to create a new A/B test for a campaign with a similar setup, you can make a new copy of it.
Choose a winner. Click "Finish A/B Test," then select one of the test groups as the winner. Choosing a winner will end the test and update all actions in the campaign with that group's settings. All users in the campaign will get these actions and settings from this moment on.
Regardless of which variant is most successful, you are ultimately in control of which version you deliver to your users.
Take notes on your results. When choosing a winner, you can write notes about the test you just finished. Add information about the declared winner and/or the metrics that were most impacted for future reference.
Updated 5 months ago
