Set up IP warmup user attributes
When you start email IP warming, you'll target small groups of users at first, then gradually increase your sending volume each day to develop a healthy sending reputation.
ISPs are looking for positive engagement with these early mailings, so it's best to target users who have a history of positive engagement with your mailings (opens, clicks, etc.). The best way to achieve this is to:
- Compile a CSV file of your engaged email users.
- Set a user attribute for these users based on which day of the IP warming schedule they should receive mail, front-loading the most engaged users at the beginning of the warming period.
Why user attribute targeting?Setting a user attribute gives you total control over exactly which users receive your IP warming email. This is crucial when we want to reach a very specific number of unique users each day.
1. Identify engaged users
During the warmup period, it's critical to target your most active and engaged subscribers. Go through any historical data you have on opens, clicks, or other positive engagement trends over the last 3-6 months.
Engagement level | Last user email engagement | Mail during warmup? |
|---|---|---|
Most engaged | 0-3 months | Yes |
Moderately engaged | 3-6 months | Yes |
Unengaged/Dormant | 6-12+ months | No |
Avoid emailing users with outdated or invalid email addresses during the warmup period. Consider using an email verification service like BriteVerify or EmailOversight to help clean up your mailing list.
If you don't have access to email engagement data, consider using mobile app engagement data. Have users opted in for push or opened your mobile app recently? This could indicate that they are active and more likely to engage with messages and email communications.
2. Set up a CSV file
Once you've identified your most engaged users, you'll use a CSV file to create User Attributes for each user's IP warmup day. Earlier days of the warmup period should include your most engaged users, and you can add in moderately engaged users for later days in the warmup schedule.
The header row of the CSV file must contain the following values:
userId— the unique leanplum ID you have set for each user.userAttributes.email— the email User Attribute you have set for Leanplum email. We recommend justemail, though you could use another naming convention. (If you already uploaded email attributes to Leanplum, you won't need to include the email attribute in your CSV.)userAttributes.warmupDay— the user attribute you are setting for IP warmup day schedule. Following the IP warming schedule, set up your most engaged subscribers for earlier days of the warmup, then set moderately engaged users for later days of the warmup period.
These header values should be formatted exactly as shown above, separated only by commas (unless your email attribute is called something different than "email.") Example header row: userId,userAttributes.email,userAttributes.warmupDay.
Each additional row should represent one user's value matching the header column. For example: user2543,[email protected],Day2.
User attribute naming should match everywhereYour user attributes should match exactly in all places your app is collecting/sending data to us. For example, if your Leanplum user attribute for email is “email” in your code, but you send us “Email” in the initial CSV file to upload, you will end up setting two separate attributes for email by mistake).
Use a plain text editor when creating or altering your CSV fileUse your preferred text editor, like Sublime or Atom, to create and edit your CSV file. Opening a CSV with Excel or other programs can add unwanted formatting changes that will affect your upload.
Example schedule:
Warmup Day 1 = 50 of most engaged users get a Day1 attribute value.
Warmup Day 2 = 100 of most engaged users get a Day2 attribute value
Warmup Day 3 = 200 engaged users get a Day3 attribute value.
And so on…
Day | Number of users to email |
|---|---|
1 | 50 |
2 | 100 |
3 | 200 |
4 | 400 |
5 | 800 |
6 | 1,500 |
7 | 3,000 |
8 | 6,000 |
9 | 10,000 |
10 | 20,000 |
11 | 40,000 |
12 | 80,000 |
13 | 150,000 |
14 | 300,000 |
15 | 600,000 |
16 | 1,200,000 |
17 | 2,400,000 |
18 | 4,500,000 |
19 | 9,000,000 |
20 | 15,000,000 |
21 | 2x sends daily |
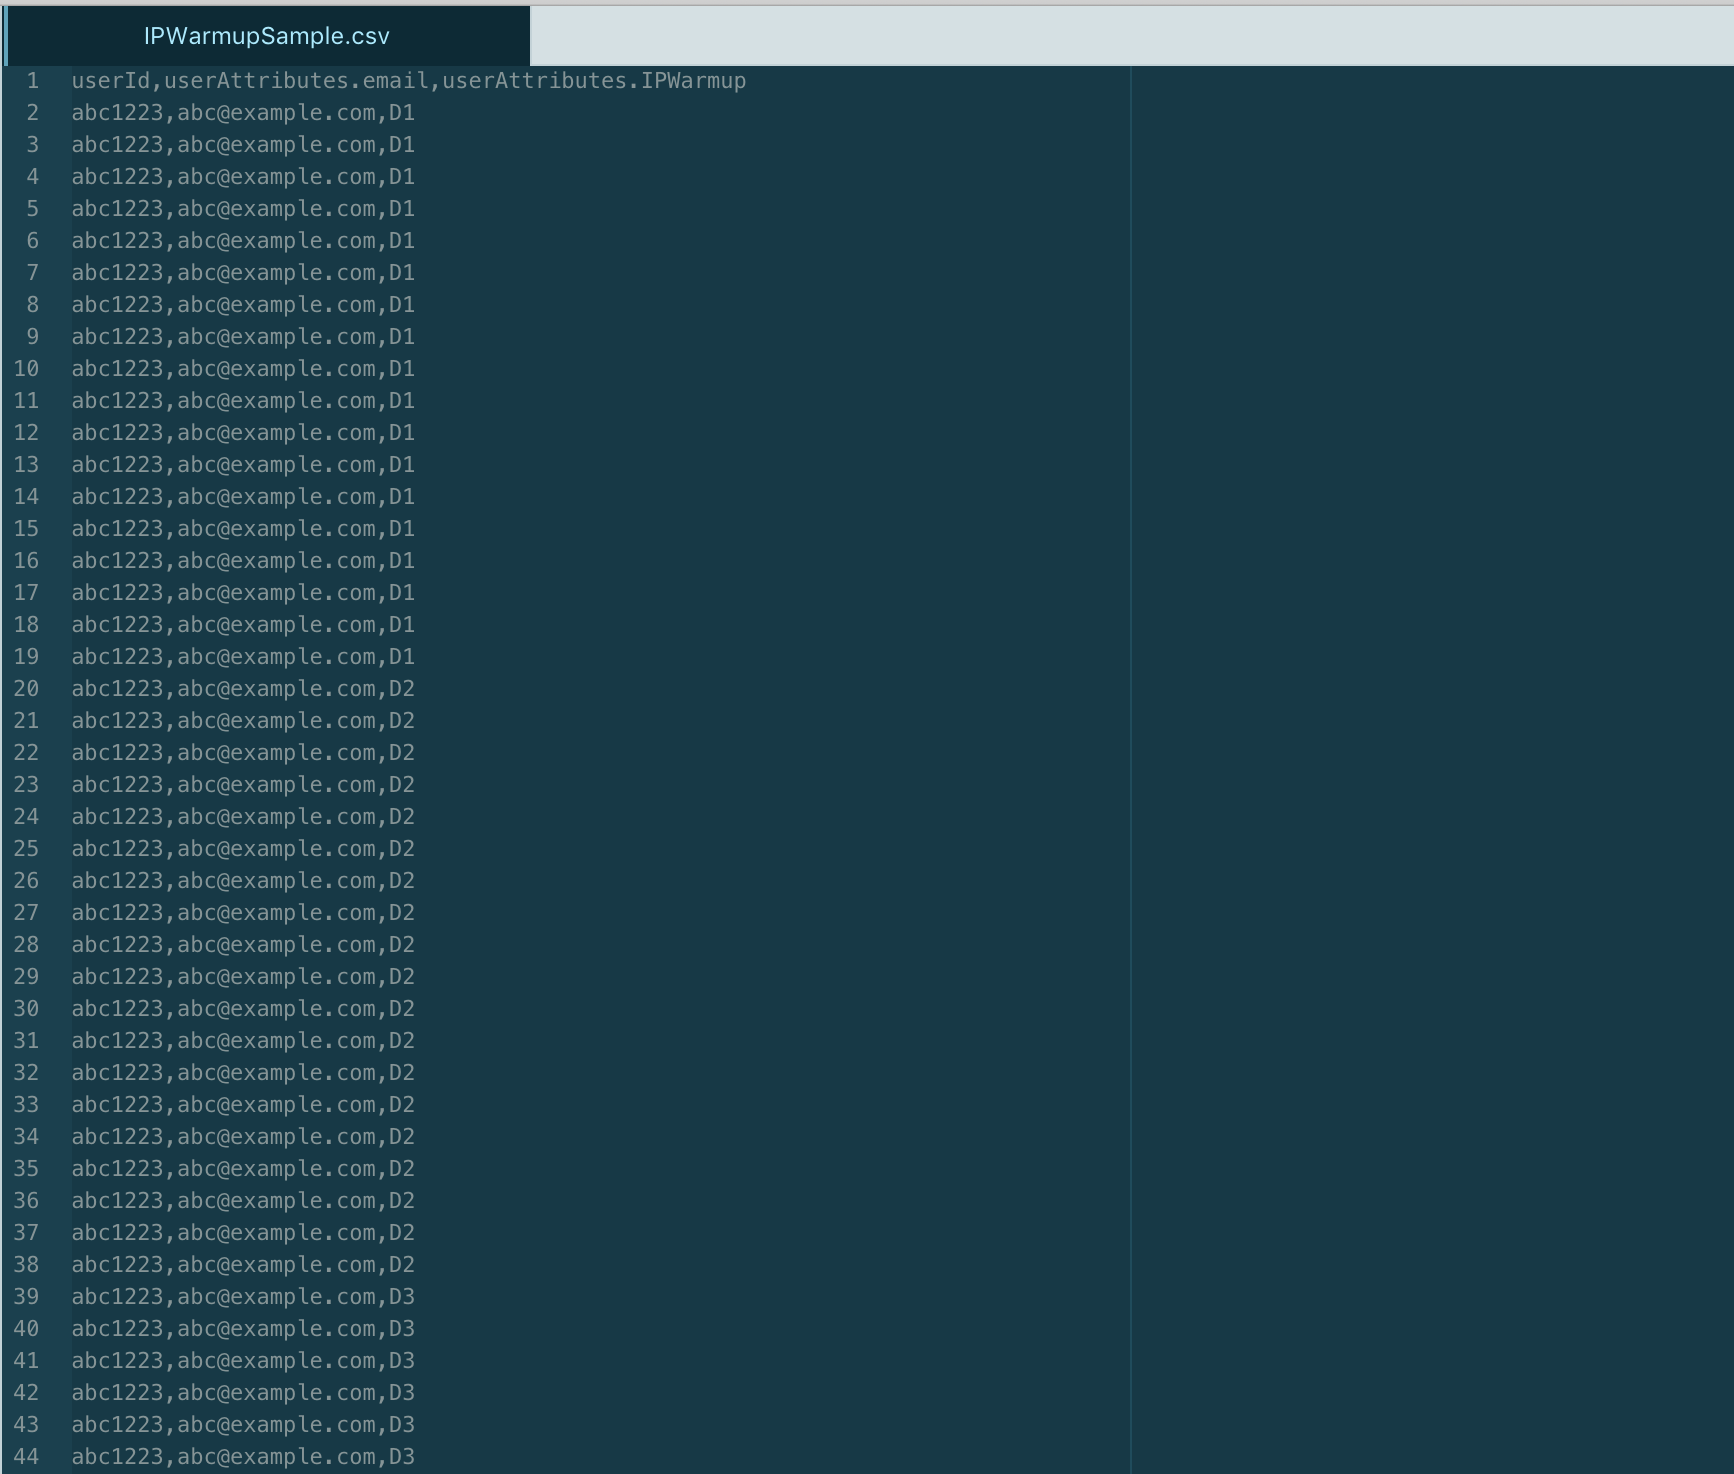
Your final CSV should look something like this. There's a user attribute called IPwarmup in the header column, and we used D1, D2, and D3 to represent each day of the schedule.

Don't send too many emails in the early days of the warmup.Make sure to assign the right number of rows (email users) for each warmup day based on the schedule above. Large volumes of mail being sent from a new or "cold" IP can be interpreted as spam by ISPs, which can damage your sending reputation and cause send failures.
Upload the CSV to your Leanplum Google Bucket
Once you've verified that your CSV is formatted correctly, your support team member can give you access to your Leanplum Google Bucket. You'll need to link to the appropriate Google Bucket folder to upload your file to Leanplum with our API.
3. Construct the API call
Once your CSV file is ready, you'll upload it to Leanplum using a multi API call.
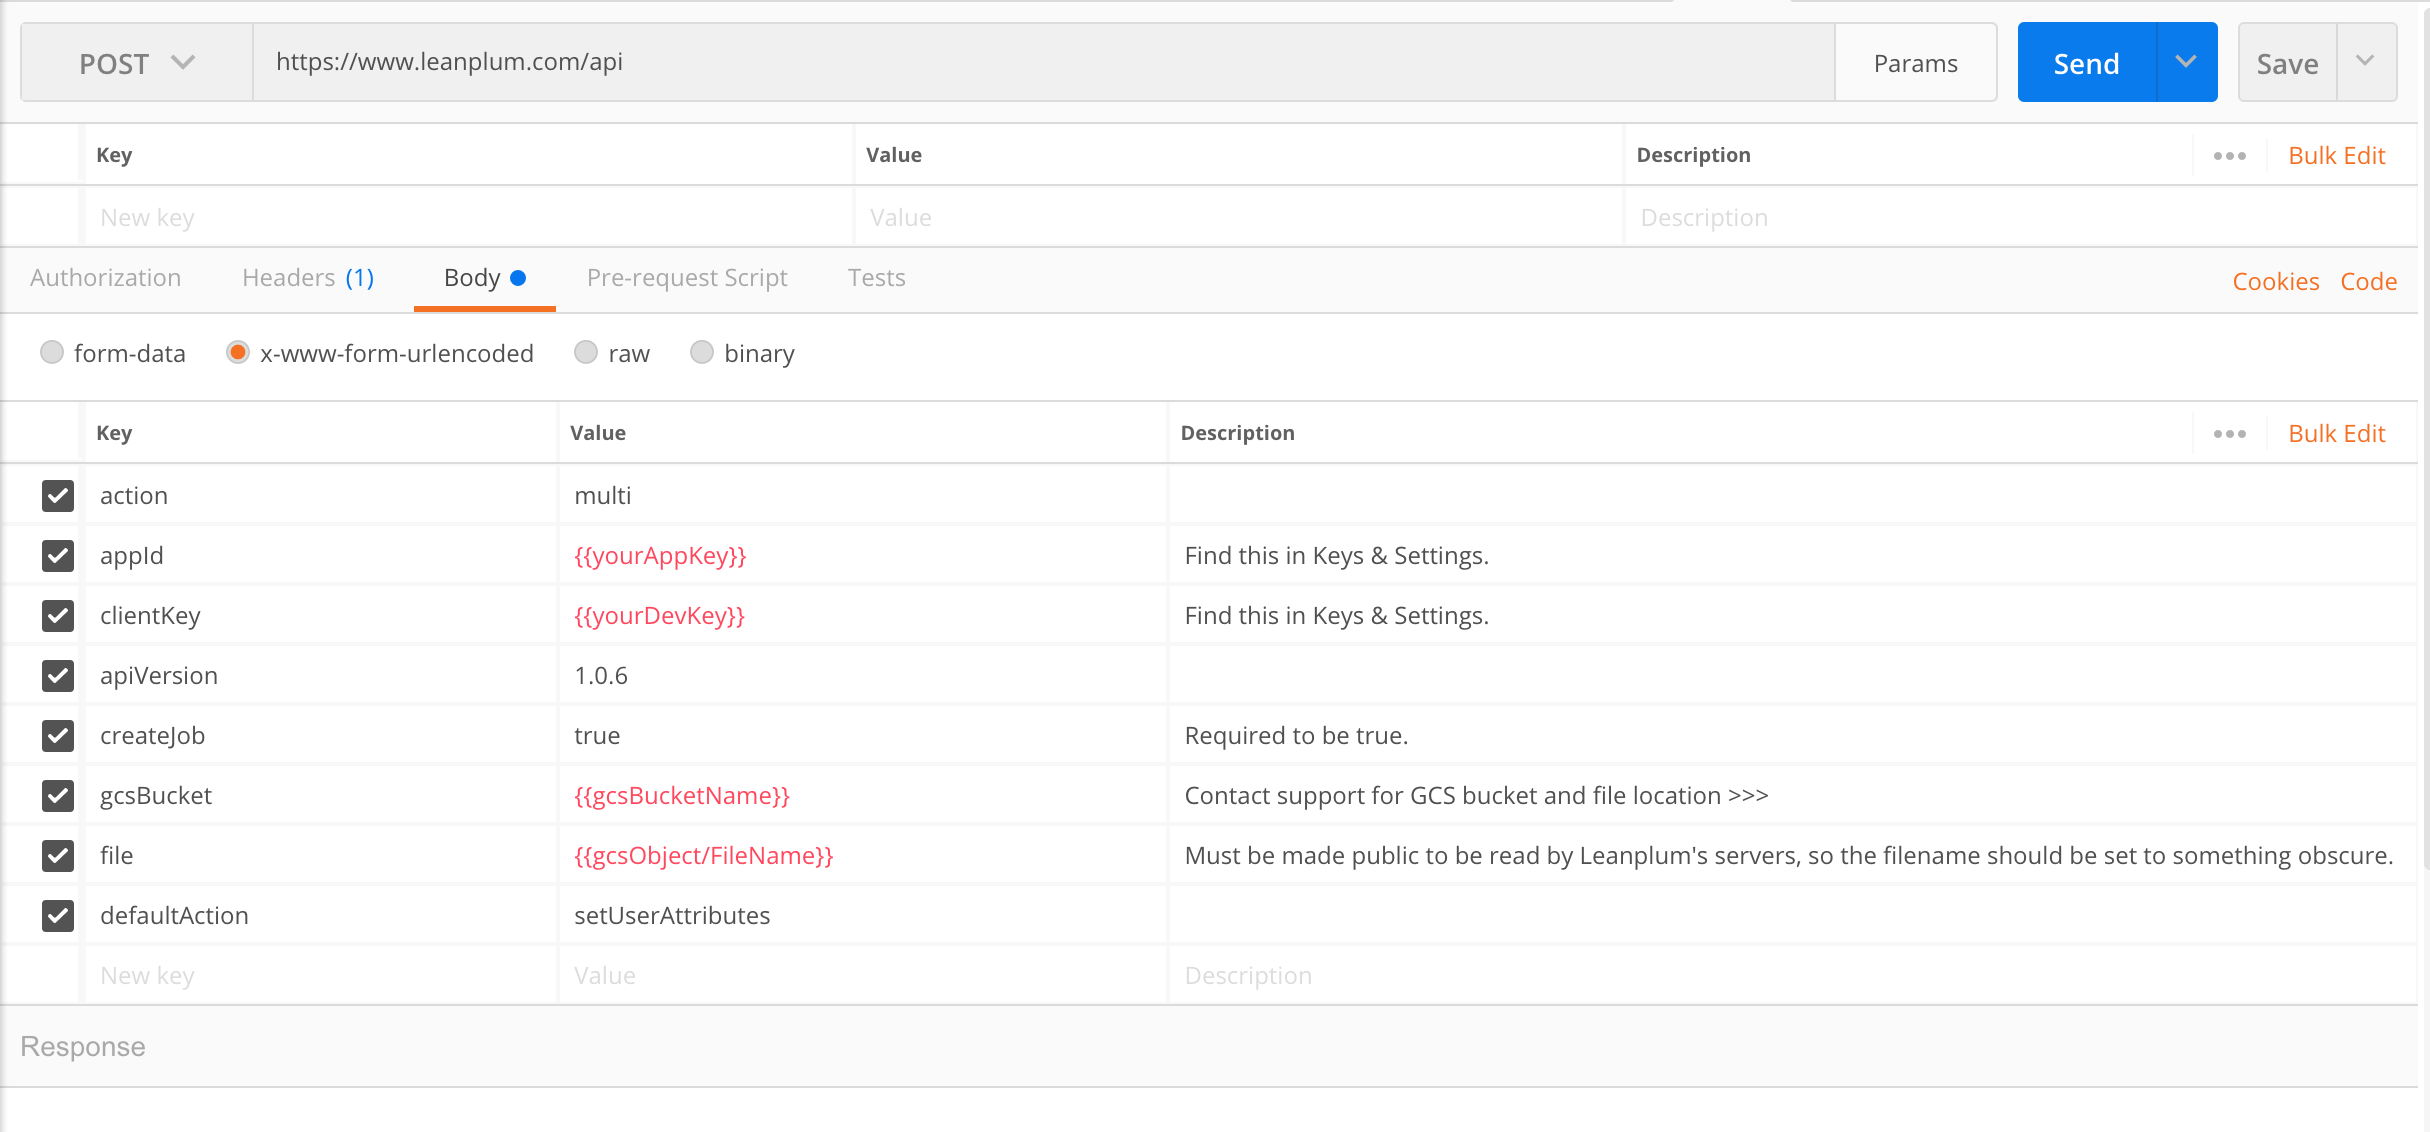
Use the following parameters for the call:
defaultAction: setUserAttributesgcsBucket: the name of the Google Bucket provided to youfile: the URL location of the CSV file in your Google Bucket folderappIdandclientKey(development key) from your Keys & Settings

You can use whatever API client you like best. We used Postman because it's free and easy to visualize what's happening.
Here's the call with example parameters. To keep your app keys and file location more secure, send all your params over https in the body of the POST request, as pictured above.
https://www.leanplum.com/api?action=multi&apiVersion=1.0.6&appId={Your_App_ID}&clientKey={Your_Dev_Key}&defaultAction=setUserAttributes&gcsBucket={bucket_name}&file={path/file_name}&createJob=true4. Monitor your CSV upload
When you make the multi/CSV upload call, you should get a response with a jobId like this:
{"response":[{"jobId":"multi_655140000980800_55XXXX2038XXXX68","success":true}]}
Check for any errors. If your response returns an error instead of a jobId, make sure you used the right keys and other parameter values in themulticall.
It can take some time to upload all of the User Attributes, especially if you are updating a lot of user profiles. You can use getMultiResults to see if your upload is finished.
Once the job is complete, check a few user profiles in the Audiences tab to verify your WarmupDay attribute is populating.
After you verify your email and IP warming user attributes are set up correctly, you can create your IP warming campaign.
Updated 5 months ago
