Marketo integration
The integration between Marketo and Leanplum allows marketers to deliver omni-channel campaigns and to transfer web-originated user behavior data to mobile.
For setup instructions and more info, see Marketo's integration guide.
The powerful integration between Marketo and Leanplum allows marketers and product managers to serve omnichannel campaigns and to transfer web-originated user behavior data to mobile and vice-versa.
Below, we summarize the steps needed to set up your Marketo environment and provide examples of several useful use-cases that show the rich potential of cross-channel messaging for marketers both in native mobile applications and on the Web.
Setup
This section assumes that:
- Leanplum’s SDK has been added to your mobile application.
- Marketo tagging has been added to your web application.
- You are familiar with the dashboards of Leanplum and Marketo.
- Push Messaging is enabled in Leanplum’s Dashboard.
- API access is enabled in Leanplum:
Configure Marketo
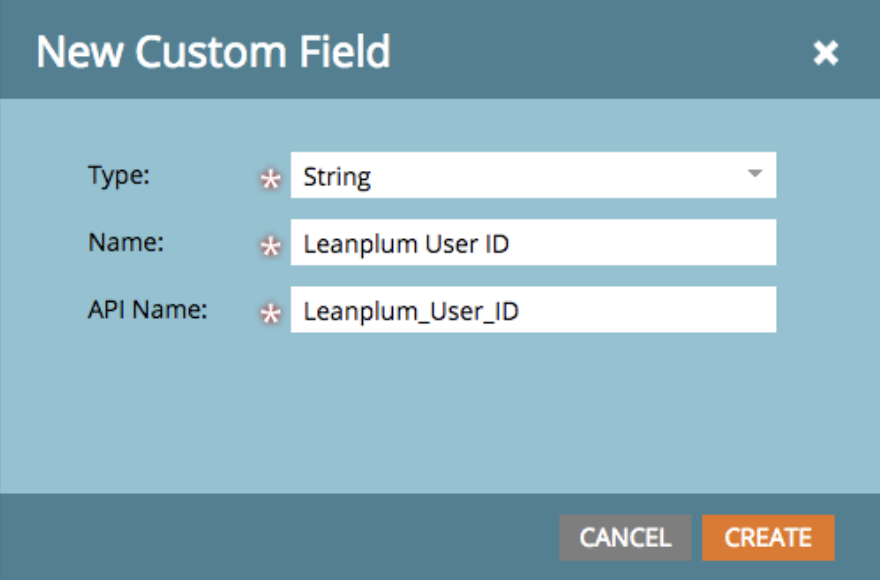
Add Custom Fields that will allow Leanplum data to be associated on a per Lead basis in Marketo. From the Marketo dashboard, go to Admin > Field Management > New Custom Field to add the following fields:
Display Name | API Name | Data Type | Comment |
|---|---|---|---|
Leanplum ID | Leanplum_User_Id | String | This field will represent the Device ID of the user. |
Leanplum App ID | Leanplum_App_Id | String | This is the application ID in Leanplum. |
Leanplum Production ID | Leanplum_Production_Id | String | This is the Production ID (replace it with your Development ID if you want to work with your developer mode devices) |
Leanplum Message ID | Leanplum_Message_Id | String | This is the message ID from Leanplum |
Leanplum Message Text | Leanplum_Message_Text | String | This is used to pass custom push messages to Leanplum |
Leanplum Attribute Name | Leanplum_Attribute_Name | String | This is used to store the name of custom user attributes before passing them Leanplum |
Leanplum Attribute Value | Leanplum_Attribute_Value | String | This is used to store the value of custom user attributes before passing them Leanplum |

Add webhooks
Next, add the following webhooks from Marketo to Leanplum. From the Marketo Dashboard, go to Admin > Integration > Webhooks.
1. Leanplum Send Push Notification — GET request
URL: http://www.leanplum.com/api?apiVersion=1.0.6&action=sendMessage&appId={{lead.Leanplum_App_ID}}&clientKey={{lead.Leanplum_Production_ID}}&messageId={{lead.Leanplum_Message_ID}}&deviceId={{lead.Leanplum_User_ID}}
2. Leanplum Push Notification with Custom Message — GET request
URL: http://www.leanplum.com/api?apiVersion=1.0.6&action=sendMessage&appId={{lead.Leanplum_App_ID}}&clientKey={{lead.Leanplum_Production_ID}}&messageId={{lead.Leanplum_Message_ID}}&deviceId={{lead.Leanplum_User_ID}}&values={{lead.Leanplum_Message_Text}}
3. Leanplum Update User Attribute — POST request
Request Token Encoding: JSON
URL: http://www.leanplum.com/api?apiVersion=1.0.6&action=setUserAttributes&appId={{lead.Leanplum_App_ID}}&clientKey={{lead.Leanplum_Production_ID}}&deviceId={{lead.Leanplum_User_ID}}
Template:
{
    "userAttributes": {           {{lead.Leanplum_Attribute_Name}}: {{lead.Leanplum_Attribute_Value}}
    }
}
Configure Leanplum
Now enable Marketo data synchronization with Leanplum. This will allow targeting and segmentation in Marketo using mobile user profile data.
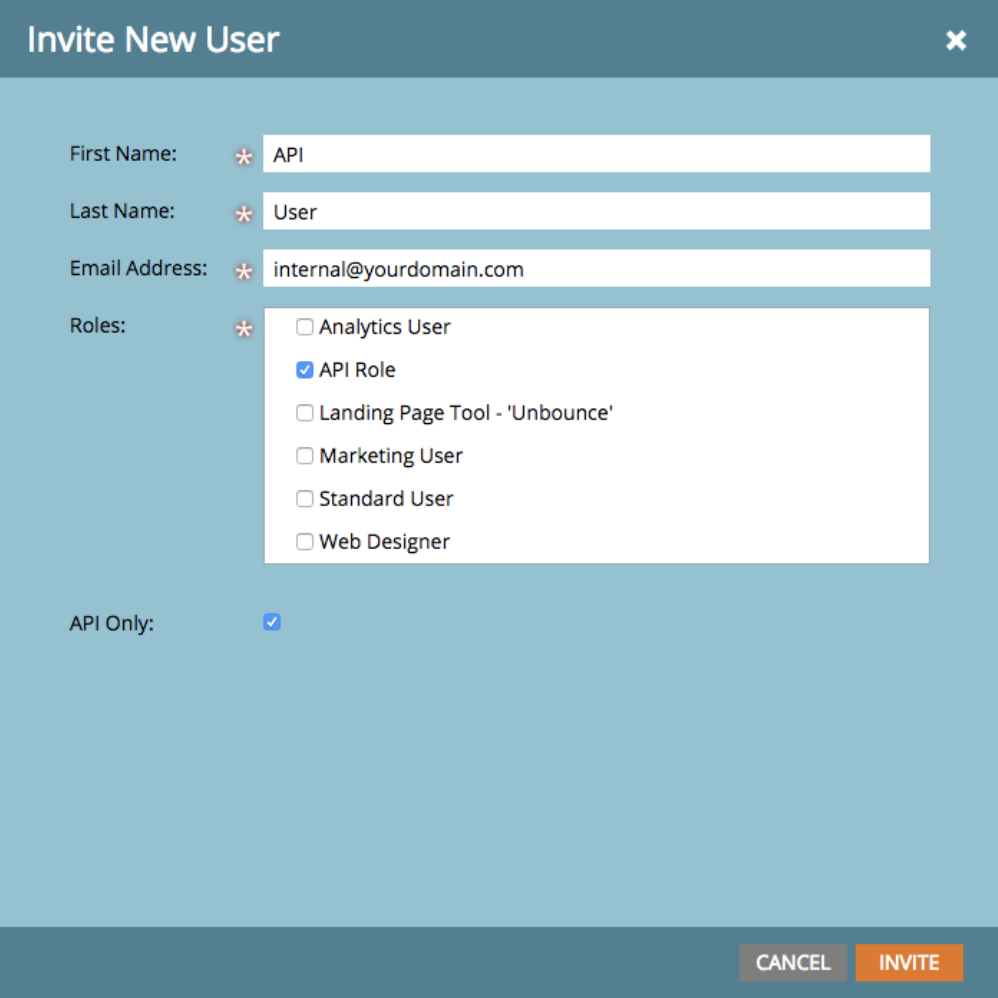
Create a role allowing access only to the API:

Create a LaunchPoint service as described in the Marketo documentation.
Supply your Leanplum Customer Success Manager with the following info:
- REST API Endpoint and REST API Identity as seen in Admin > Integration > Web Services > REST API section.
- Marketo Service Client ID and Client Secret as seen in Admin > Integration > LaunchPoint > View Details.
Leanplum’s Customer Success team will set up a service with the needed frequency of updates to sync user data collected through your mobile application with Marketo.
Use cases
In this section, we’ll demonstrate the effectiveness of the integration between Leanplum and Marketo in practice. There are many other use-cases that can be explored. Please, refer to your Customer Success Manager at Leanplum for more insight on best practices and optimal results.
Web-triggered Mobile Push Messaging Campaign
-
In the Leanplum dashboard, create a new Push Message campaign with a scheduled delivery.
-
Copy the Message ID from the webpage's URL. You'll need this for a later step.

URL format
-
Next, go to Leanplum App Settings and click Keys & Settings. Then, copy your App ID and Production ID for your app.
-
In the Marketo dashboard, create a new Smart Campaign. Add a filter in the Smart List tab that targets the campaign only to users known to Leanplum (the “Leanplum ID field "is not empty").

You may also add additional filters and triggers based on your needs. For instance, a lead filling a form, change in the status of a lead, etc.
- Configure the Flow section of the Smart Campaign in Marketo by changing the values of Leanplum Production ID, Leanplum App ID, and Leanplum Message ID fields of the filtered leads. Also, Call the “Leanplum Send Push Notification” Webhook, which we defined in point (1.a.i.) in the Setup process. This webhook will trigger the Push Message in Leanplum.
Mobile Push Messaging Campaign with a custom web-triggered message
-
In Leanplum, create a new Push Message campaign with a scheduled delivery.
-
Define the copy of the message to {{“message”}}. This template is used when making the Webhook call from Marketo to Leanplum.
-
Copy the Message ID from the webpage URL. Then go to App Settings and copy your App ID and Production ID keys.
-
Create a new Smart Campaign in Marketo. Add a filter in the Smart List tab that targets the campaign only to users known to Leanplum (the Leanplum ID field "is not empty").
-
Configure the Flow section of the Smart Campaign in Marketo by changing the values of Leanplum Production ID, Leanplum App ID, and Leanplum Message ID fields of the filtered leads. Also, change the value of the Leanplum Message Text field of the filtered leads by providing a JSON format value of the “message” variable we specified in point (a.) above.
For our example, we used:

This utilizes the value of the “lead.First Name” field for each lead in Marketo to customize the message sent to the mobile users recognized as leads.
In the end, call the “Leanplum Send Push Notification with Message” Webhook, which we defined in the Setup process. This webhook will trigger the Push Message in Leanplum with the custom message value rendered in Marketo.
Mobile user attribute updates with web-originated data
-
Create a new Smart Campaign in Marketo. Add a filter in the Smart List tab that targets the campaign only to users known to Leanplum (the Leanplum ID field "is not empty").
-
Configure the Flow section of the Smart Campaign in Marketo by changing the values of Leanplum Production ID and Leanplum App ID fields of the filtered leads. Also, change the value of the Leanplum Attribute Name and Leanplum Attribute Value field of the filtered leads.
For our example, we used “SFDC_Created_Date” for the value of Leanplum Attribute Name and “{{lead.SFDC Created Date }}“ or the value of Leanplum Attribute Value. This utilizes the value of the “lead.SFDC Created Date” field for each lead in Marketo to generate a POST API request to Leanplum, having the following JSON payload:

- In the end, call the “Leanplum Update User Attribute” Webhook, which we defined in point (1.a.iii.)
in the Setup process. This webhook will update the user attribute with name matching the value of the field Leanplum Attribute Name in Leanplum.
Your campaign is all set to update the profiles of your mobile users with web-triggered attribute data. Once the campaign is running, you can check if the user attributes are properly set up and updated in Leanplum Dashboard > Users.
Updated 5 months ago
