Change a user's App Icon
In this article, you will see how you can change your app icon on the fly in your iOS app with Leanplum. Rather than resubmitting your app to the App Store with each change, you can now add alternate icons ahead of time and switch between them using Leanplum.
Overview
Starting with the Leanplum SDK (v 2.0.0+), we have added support for changing app icons, which allows you to change your icon -- for just a select group of users, or all -- from the Leanplum dashboard.
There are four ways to do so:
- In-App Action: immediately changes the icon, and only displays a confirmation message to the user after doing so.
- In-App Message with Action: changes the icon after a user interacts with the in-app message. Depending on the message template, you can set the Dismiss, Cancel, or Accept action to Change App Icon.
- Push notification with Open Action: immediately changes the icon after the user opens the push notification.
- App Inbox Message with Open Action: immediately changes the icon after the user opens the message.
Send an In-app Action
Leanplum lets you directly change a user's app icon with an In-app Action.
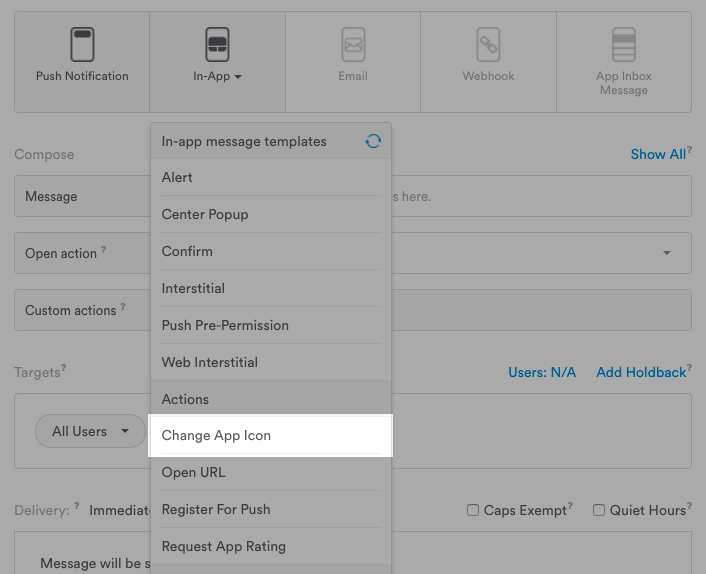
- From the Message Composer, select In-app > Actions > Change App Icon.

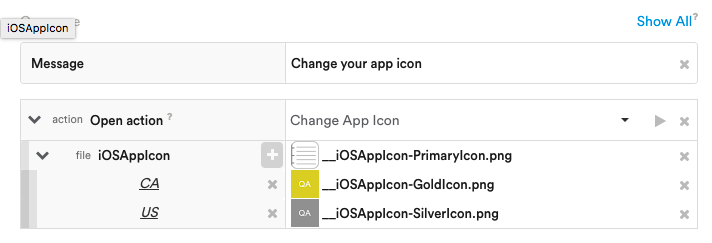
- In the Compose settings, click the row iOSAppIcon row to select the new App Icon.
- Choose the Icon file.
- Add any segments (to set different icons for different users, or different regions). Hover over the iOSAppIcon cell and click the + symbol. Then, click into the file cell to edit/select an icon.

- Set your targeting criteria (defaults to All Users).
- Set the delivery type (Immediate, Scheduled, Triggered, etc.).
- Click Send Now / Schedule.
Send an In-app Message with an Action
If you want to give the user a choice, you can use an in-app message with an Accept Action. Each user will have the option to decline the icon change. Given that, the best template to use is the Confirm in-app message.
- From the Message Composer, select In-app > Confirm.
- Customize you message as would normally.
- Set the Accept Action to Change App Icon.
- Click the row iOSAppIcon row to select the new App Icon.
- Choose the Icon file.

- Add any segments (to set different icons for different users, or different regions). Hover over the iOSAppIcon cell and click the + symbol. Then, click into the file cell to edit/select an icon.
- Set your Targets (defaults to All Users).
- Set the Display when criteria.
- Click Start.
While you can use other in-app message templates and set Cancel or Decline actions to Change App Icon, it's best practice to use either the Confirm, Center Popup, or Interstitial templates since these all feature an Accept Action.
Send a Push Notification with Open Action
If you want to make the Icon change immediately, you can use a push notification with an Open Action (the action that will occur immediately after a user opens the push notification):
- From the Message Composer, select Push Notification.
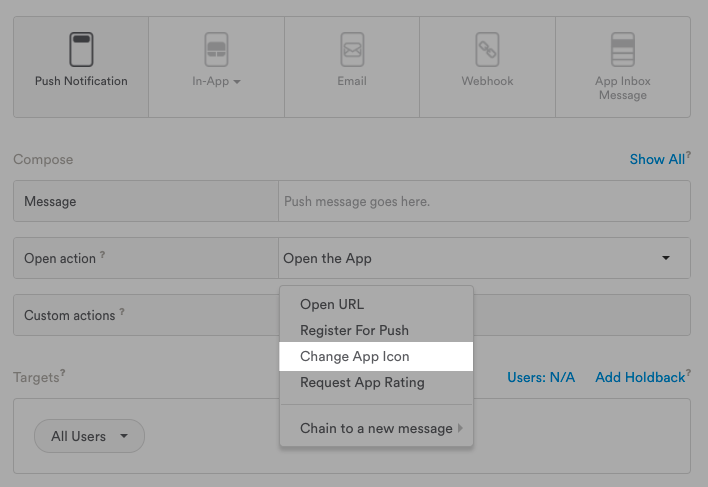
- Set the Open Action to Change App Icon.

- Add any segments (to set different icons for different users, or different regions). Hover over the iOSAppIcon cell and click the + symbol. Then, click into the file cell to edit/select an icon.

- Set your targeting criteria (defaults to All Users).
- Schedule the message.
- Click Send Now / Start / Schedule.
Send an App Inbox Message with Open Action
You can also send an App Inbox Message to reset/change the user's App Icon.
- From the Message Composer, select App Inbox Message.
- Set the Open Action to Change App Icon.
- Add any segments (to set different icons for different users, or different regions). Hover over the iOSAppIcon cell and click the + symbol. Then, click into the file cell to edit/select an icon.

- Set your targeting criteria (defaults to All Users).
- Schedule the message.
- Click Send Now / Start / Schedule.
Updated 4 months ago
